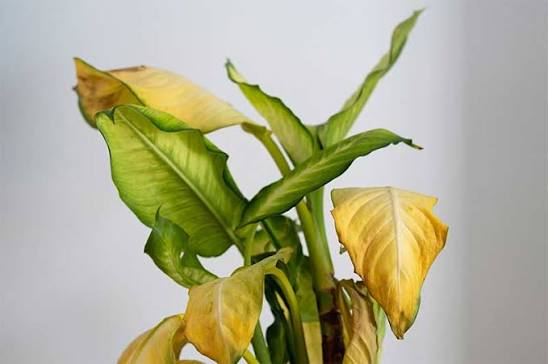
Finding a bright yellow leaf on an indoor plant is one of the most common warning signs a plant owner faces. The typical reaction is immediate intervention: drenching the dry surface with water, pouring in a heavy dose of liquid fertilizer, or moving the pot directly onto a blazing windowsill.
These rapid, unverified fixes often do more harm than good. Yellowing foliage—known botanically as chlorosis—occurs when a plant stops producing chlorophyll or breaks down its green pigment to reallocate resources elsewhere. Because plants react with yellow leaves to completely opposite stressors, adding water or fertilizer without a systematic diagnosis often accelerates root decline.
Before changing your care routine or reaching for chemical feeds, work through a structured diagnostic process to identify the root cause.
1. Quick Diagnostic Reference: Reading the Symptoms
A yellow leaf tells a distinct story depending on which leaves are affected, how the texture feels, and where the discoloration begins.
+-------------------------------------+-----------------------------------+------------------------------------------+
| Leaf Appearance & Location          | Physical Texture                  | Primary Suspect                          |
+-------------------------------------+-----------------------------------+------------------------------------------+
| Lower, older leaves turning yellow  | Soft, limp, swollen, or mushy     | Overwatering / suffocated roots          |
+-------------------------------------+-----------------------------------+------------------------------------------+
| Lower leaves yellowing, dry margins | Crispy, dry, papery edges         | Underwatering / severe root desiccation  |
+-------------------------------------+-----------------------------------+------------------------------------------+
| Pale yellowing on side facing wall  | Normal or thin, stems reaching    | Insufficient light exposure              |
+-------------------------------------+-----------------------------------+------------------------------------------+
| Yellow with fine webbing or speckles| Stippled, dusty, or mottled       | Sap-sucking pests (spider mites, thrips) |
+-------------------------------------+-----------------------------------+------------------------------------------+
| Interveinal yellowing (veins green) | Normal texture, new upper growth  | Nutrient lockout or pH imbalance         |
+-------------------------------------+-----------------------------------+------------------------------------------+
| Occasional single, lowest leaf      | Naturally shedding with age       | Normal biological senescence             |
+-------------------------------------+-----------------------------------+------------------------------------------+
2. The Four Immediate Checks to Make First
Do not guess why your plant is struggling. Perform these four non-destructive diagnostic checks in sequence before altering your watering schedule or applying treatments.
Check 1: Probe the Deep Root Zone for Moisture
Never assess soil moisture purely by looking at the dry crust on top of the pot. Soil can appear parched at the surface while remaining waterlogged around the lower root system.
-
The Finger or Wooden Skewer Test: Insert a clean wooden chopstick or your index finger 2 to 3 inches deep into the root zone.
-
If the skewer emerges dark, damp, and clinging to moist soil particles, the root zone is wet. If yellow leaves are accompanied by wet lower soil, overwatering is the primary concern.
-
If the skewer comes out completely clean and bone-dry all the way down, the plant is chronically dehydrated.
Check 2: Inspect Container Drainage and the Saucer
A container may receive a measured amount of water, but if drainage is blocked, stagnant moisture collects at the base:
-
Lift the inner pot out of its decorative cover or saucer.
-
Check whether the drainage holes are blocked by compacted soil or tangled roots.
-
Verify whether the pot has been sitting in a saucer of stagnant runoff water. Standing water wicks back into the potting medium via capillary action, cutting off oxygen to root hairs.
Check 3: Check the Roots Directly
If leaves are soft, yellow, and the soil feels persistently damp, check the root system itself:
-
Gently support the plant at its base and slide the root ball out of the pot.
-
Healthy Roots: Firm, flexible, and white, cream, or light tan in color.
-
Compromised Roots: Dark brown or black, slimy, mushy, and carrying a sour or swampy odor. This confirms active fungal root rot, which prevents the plant from taking up water and nutrients despite wet soil.
Check 4: Inspect the Undersides of Leaves for Pests
Pests target stressed indoor plants, piercing cell walls to extract sap:
-
Use a magnifying glass or your phone’s camera zoom to inspect the undersides of yellowing leaves and where leaf stems join the main stalk.
-
Look for tiny moving specks, fine silken webbing (spider mites), cottony white cushions (mealybugs), or tiny brown oval bumps that scrape off with a fingernail (scale insects).
3. Resolving the Root Cause
Once you pinpoint the failure point, apply the appropriate corrective measure.
Fixing Overwatered Plants and Root Rot
-
Stop Watering Immediately: Allow the root zone to dry out until the top two inches are distinctly dry.
-
Trim Rotting Tissue: If roots are brown and mushy, use sterilized shears to prune away all decayed sections back to firm tissue.
-
Repot into Fresh Aerated Mix: Discard wet, sour soil and repot the plant into clean soilless potting mix amended with coarse perlite or pumice to restore air channels.
-
Prune Hopeless Foliage: Snip off completely yellowed, limp leaves near the stem so the plant conserves energy for root recovery.
Correcting Dehydration
If the root ball has dried out so thoroughly that soil has pulled away from the inner edges of the pot, top-watering often runs straight down the sides without wetting the center.
-
Bottom-Water the Pot: Place the pot in a basin filled with 2 to 3 inches of tepid water. Let it absorb water through the drainage holes for 30 to 45 minutes until the top surface feels cool and slightly damp, then lift it out to drain completely.
Adjusting Light Levels
Plants that do not receive enough light cannot support their existing leaf mass. When light drops (especially in late autumn), a plant naturally sheds interior or lower leaves to reduce its metabolic load.
-
Move low-light plants closer to east- or south-facing windows, or supplement with a full-spectrum LED grow light set on a 12-hour timer.
-
Rotate the container a quarter-turn each week to ensure all sides receive even light exposure.
4. Common Mistakes to Avoid
-
Fertilizing a Stressed Plant: Never apply liquid or granular fertilizer to a plant that is yellowing from water stress or root issues. Fertilizers deposit concentrated mineral salts; if damaged roots cannot process them, the salts scorch remaining root tips and worsen the decline.
-
Watering on a Strict Calendar Schedule: Environmental conditions shift weekly based on temperature, humidity, and daylight hours. Watering every “Tuesday and Friday” guarantees overwatering in winter and underwatering during hot summer spells. Always check soil moisture manually before watering.
-
Confusing Normal Aging with Disease: If your plant produces healthy, vigorous new green leaves at the top while dropping a single, faded lower leaf every few months, do not panic. This is standard biological turnover.
Frequently Asked Questions
Can a yellow leaf turn green again?
In almost all cases, no. Once a leaf turns completely yellow, its chlorophyll has degraded, and the plant has already broken down cellular structures to reabsorb mobile nutrients. It is best to prune entirely yellow leaves with clean shears so the plant can direct its energy into healthy new growth.
How do I know if yellowing leaves are caused by cold drafts?
If yellowing occurs suddenly within 24 to 48 hours following a cold snap, and the affected leaves curl, wilt, or turn translucent without being mushy, draft exposure is the likely cause. Check if the plant sits in the direct path of an air conditioning vent, an exterior door, or an uninsulated window pane.
What is “interveinal chlorosis”?
Interveinal chlorosis occurs when the leaf blade tissue turns pale yellow while the veins remain distinctly dark green. This typically signals a micronutrient deficiency (most commonly iron, magnesium, or manganese) or an alkaline soil pH that prevents the roots from taking up these minerals.
Why do plant leaves turn yellow right after repotting?
This is typically transplant shock. Moving a plant into a new container inevitably disturbs delicate root hairs. If light and moisture conditions are kept stable and the pot is not oversized, the plant usually stabilizes within two to three weeks once new feeder roots establish.