Overwatering is the single most common reason potted plants fail. Most plant owners assume overwatering simply means pouring too much water into the pot at one time. In reality, overwatering is almost always a problem of frequency and poor soil oxygenation, not the physical volume of water delivered in a single session.
When potting mix remains continuously saturated, water displaces all the microscopic air pockets throughout the root zone. Plant roots require oxygen to carry out cellular respiration and absorb minerals. Without oxygen, fine root hairs suffocate within days, opening the door for opportunistic soil-borne water molds (such as Pythium and Phytophthora) to consume the root system from the tips inward.
Learning how to water thoroughly without drowning root systems comes down to understanding container hydrology, checking moisture accurately, and establishing flexible, observation-based watering habits.
1. What “Overwatering” Actually Means (Hydrology Basics)
To protect your plants, it helps to understand what happens inside a container when you pour water onto the soil:
-
Frequency vs. Volume: Drenching a plant with a large volume of water until it flows freely from the drainage holes is not overwatering—it is a healthy, thorough watering. Overwatering occurs when you water again before the soil has dried down to the plant’s biological threshold.
-
The Perched Water Table: In any container, gravitational water drains downward until it reaches the base. Due to capillary action, a saturated layer of water naturally settles across the bottom portion of the pot (known as a perched water table). If a container lacks drainage holes or sits in a puddle of runoff water, this saturation line rises, drowning lower feeder roots.
-
Root Hypoxia: When air cannot enter the potting mix, roots starve of oxygen (hypoxia). Once roots begin decaying, the plant can no longer transport moisture up to its foliage. As a result, an overwatered plant often wilts, prompting owners to add even more water—a cycle that quickly proves fatal.
+---------------------------+-----------------------------------+-----------------------------------------+
| Condition                 | Visual Foliage Symptoms           | Root Zone Condition                     |
+---------------------------+-----------------------------------+-----------------------------------------+
| Healthy Hydration         | Firm, upright stems; vibrant leaf | Moist, aerated potting mix; firm, light-|
|                           | color with natural flexibility    | colored roots                           |
+---------------------------+-----------------------------------+-----------------------------------------+
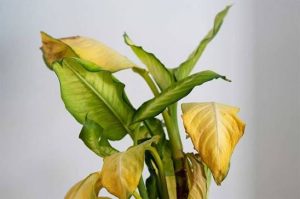
| Overwatered / Root Rot    | Yellowing lower leaves; limp, soft| Stagnant, boggy soil; dark, mushy roots |
|                           | foliage; leaf drop; brown edema   | with an earthy or sour odor             |
+---------------------------+-----------------------------------+-----------------------------------------+
| Under-Hydrated            | Crispy leaf margins; dull foliage;| Dry, contracted soil pulling from edges;|
|                           | drooping stems that perk up fast  | pale, brittle roots                     |
+---------------------------+-----------------------------------+-----------------------------------------+
2. Three Reliable Ways to Test Soil Moisture Before Watering
Abandon rigid calendar schedules like “watering every Sunday.” Plant water consumption shifts constantly depending on room temperature, ambient humidity, pot material, and seasonal light levels. Always verify the moisture level inside the root zone using one of these practical methods.
1. The Wooden Chopstick or Dowel Method
A simple untreated wooden skewer or bamboo chopstick is one of the most reliable diagnostic tools available:
-
Insert the wooden skewer deep into the potting mix, roughly two-thirds of the way down near the center of the root ball.
-
Leave it in place for 5 to 10 seconds, then withdraw it.
-
Reading the result: If the wood comes out dark, cool, and damp with bits of soil clinging to it, moisture is still present in the lower root zone—hold off on watering. If the skewer emerges clean and completely dry, the plant is ready for water.
2. The Container Lift Test (Weight Check)
Water is heavy; a gallon of water weighs over 8 pounds. Over time, lifting your potted plants teaches your hands to gauge moisture levels automatically:
-
Pick up the pot immediately after a thorough watering to register its “saturated weight.”
-
Pick it up several days later when the soil surface looks dry. If the pot still feels heavy and dense, moisture remains concentrated around the lower root zone.
-
Water only when the container feels noticeably light and balanced in your hands.
3. The Two-Knuckle Finger Probe
For moisture-loving plants that should not dry out completely:
-
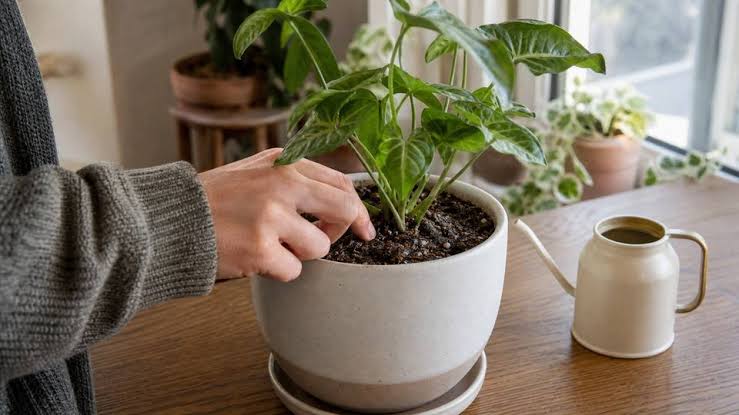
Insert your index finger 1 to 2 inches straight down into the potting mix.
-
If you feel coolness and damp granules at your fingertips, delay watering. If the top two inches feel dry, crumbly, and room temperature, it is time to irrigate.
3. Best Practices: How to Water the Right Way
When your moisture check confirms a plant is ready for water, use a technique that provides complete saturation followed by rapid drainage.
+--------------------+---------------------------------------+--------------------------------------------+
| Method             | Best Suited For                       | Step-by-Step Procedure                     |
+--------------------+---------------------------------------+--------------------------------------------+
| Top-Drench & Drain | Large floor plants, robust shrubs,    | Pour tepid water evenly over top soil      |
|                    | foliage plants with open soil space   | until 20% drains out bottom; empty saucer  |
+--------------------+---------------------------------------+--------------------------------------------+
| Bottom-Watering    | Compact herbs, African violets, plants| Place nursery pot in 2" tepid water basin; |
|                    | prone to crown rot or surface mold    | soak 20–30 min; drain excess completely    |
+--------------------+---------------------------------------+--------------------------------------------+
The “Drench and Drain” Routine
-
Use room-temperature water. Shockingly cold tap water can stress delicate tropical root systems, while hot water can scald root hairs.
-
Pour water slowly and evenly across the entire surface of the potting mix, avoiding pouring all water in a single concentrated spot.
-
Continue adding water until liquid flows freely out of the drainage holes at the bottom of the pot. This ensures that the entire root ball is moistened and prevents dry pockets from forming in the lower half of the container.
-
Allow the pot to drain completely for 15 to 20 minutes.
-
Always empty the saucer: Never allow a pot to sit in standing water in a drip tray. Water left in saucers wicks back into the lower soil via capillary action, keeping the perched water table saturated and suffocating lower roots.
The Bottom-Watering Alternative
For compact plants, herbs, or specimens prone to stem rot when foliage gets wet, bottom-watering is an excellent technique:
-
Place the pot (which must have drainage holes) into a basin or sink filled with 1 to 2 inches of lukewarm water.
-
Allow the potting soil to draw moisture upward through capillary action for roughly 20 to 30 minutes.
-
Once the top surface of the soil feels slightly cool and damp to the touch, lift the pot out.
-
Let all excess water drain freely before returning the plant to its decorative cover or saucer.
4. How Soil and Pot Selection Prevent Accidental Overwatering
Even careful watering habits can struggle if the potting mix holds water like a dense sponge. Preventing overwatering starts with the physical properties of your growing medium and container.
-
Incorporate Aeration Materials: Never use pure, dense peat moss or garden topsoil for indoor containers. Blend standard potting mix with 20% to 30% coarse perlite, horticultural pumice, or orchid bark. These chunky particles create permanent air pockets that cannot be collapsed by water, guaranteeing that oxygen reaches root hairs even immediately after irrigation.
-
Match Pot Material to Plant Species: Porous, unglazed terracotta pots allow moisture to evaporate outward through the clay walls, making them ideal for drought-tolerant species (such as succulents, cacti, rosemary, and snake plants). Non-porous plastic and glazed ceramic pots retain water significantly longer, making them better suited for moisture-loving tropicals (like ferns, calatheas, and peace lilies).
-
Avoid Oversized Containers: When repotting, only increase the container diameter by 1 to 2 inches beyond the current root ball. Putting a small root system into a massive pot creates a surrounding reservoir of excess soil that takes weeks to dry out, dramatically increasing the risk of root rot.
Frequently Asked Questions
Can I fix a plant that has already been overwatered?
Yes, if caught before root rot destroys the entire root structure. Move the plant to a warm spot with bright, indirect light and stop watering completely until the root zone dries down. If leaves continue to turn yellow and soil remains soggy for over a week, slide the plant out of the pot, inspect the roots, trim off any brown, mushy sections using clean shears, and repot into fresh, aerated potting mix with plenty of perlite.
Does adding a layer of gravel to the bottom of a pot help drainage?
No. This is a persistent gardening myth. Adding stones, broken pottery, or gravel to the bottom of a pot without drainage holes does not create drainage—it merely creates a reservoir of stagnant, stagnant water. Even in pots with drainage holes, gravel raises the perched water table closer to the root system, reducing the usable root space and increasing the likelihood of root suffocation. Always use well-aerated potting mix throughout the entire depth of the pot.
Should I water my plants less during the winter?
In most cases, yes. As daylight hours shorten and indoor temperatures drop, houseplant growth slows down significantly, reducing transpiration and water uptake. Check soil moisture more thoroughly during winter months, and expect to water roughly half as frequently as you would during the peak growth months of spring and summer.
Why do the tips of my plant’s leaves turn brown if I’m not underwatering?
Brown leaf tips can occur from several factors unrelated to drought. Overwatering that causes root damage reduces the plant’s ability to transport water to its furthest tips, creating dry, brown edges. Other common culprits include very low indoor humidity, sensitive reactions to fluoride or chlorine in municipal tap water, or an accumulation of fertilizer salts in the soil.